You are here
Frequently Asked Questions - MAILBOX Alert
You are holding the MAILBOX Alert in your hands. How do you configure it and install it?
How to CONFIGURE MAILBOX Alert
Your new MAILBOX Alert needs to connect to the internet to send its notifications. They will then be forwarded as emails and as text messages to your phone. In order to do that it needs to know which WiFi network to use for communications. Before that, your MAILBOX Alert must be configured with an email and a phone number to send notifications.
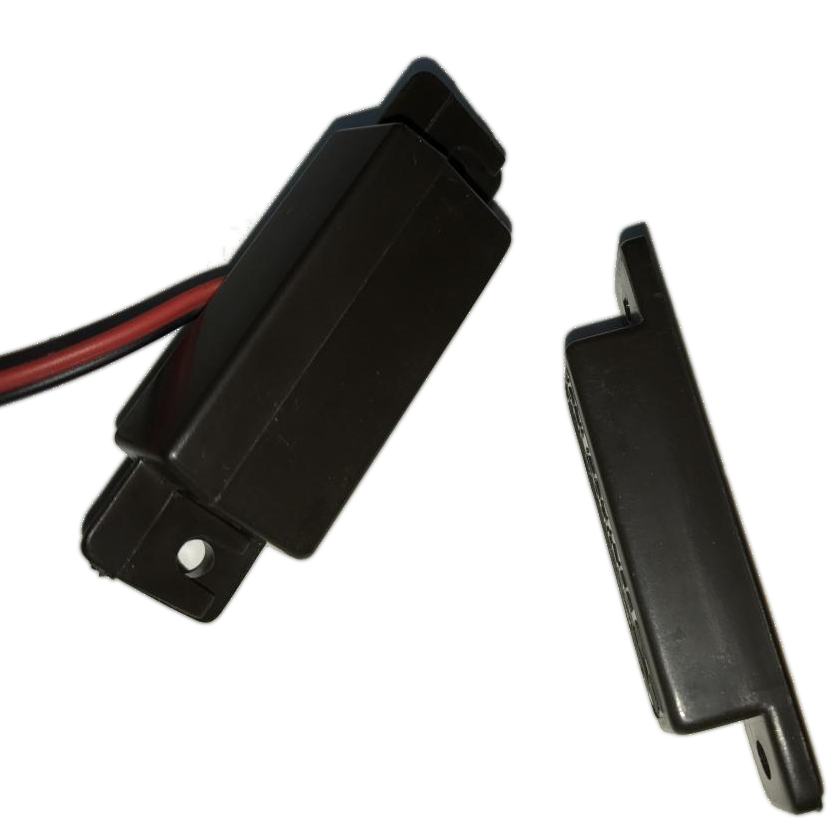
The MAILBOX Alert is shipped with batteries installed and the door sensor parts attached. When the sensor parts are separated, the device inside is turned on. If it has been configured already to use your WiFi, it will send an alert and turn itself off. If the MAILBOX Alert has not been configured yet, it will enter into a configuration mode so that you can setup your WiFi. In configuration mode the MAILBOX Alert will shut itself off after 5 minutes to save batteries. If you haven't completed your configuration, re-attach the sensor parts for a second. You can then separate them again which will turn the device back on.
Note: we recommend that you connect your device to WiFI, create your account and test notifications before you head outside to installl your device. So follow SETUP INSTRUCTIONS then move on to the installation described below.
How to INSTALL MAILBOX Alert
The installation of MAILBOX Alert that is described here assumes that your mailbox is mounted on a wooden post. Please adapt to your individual circumstances.
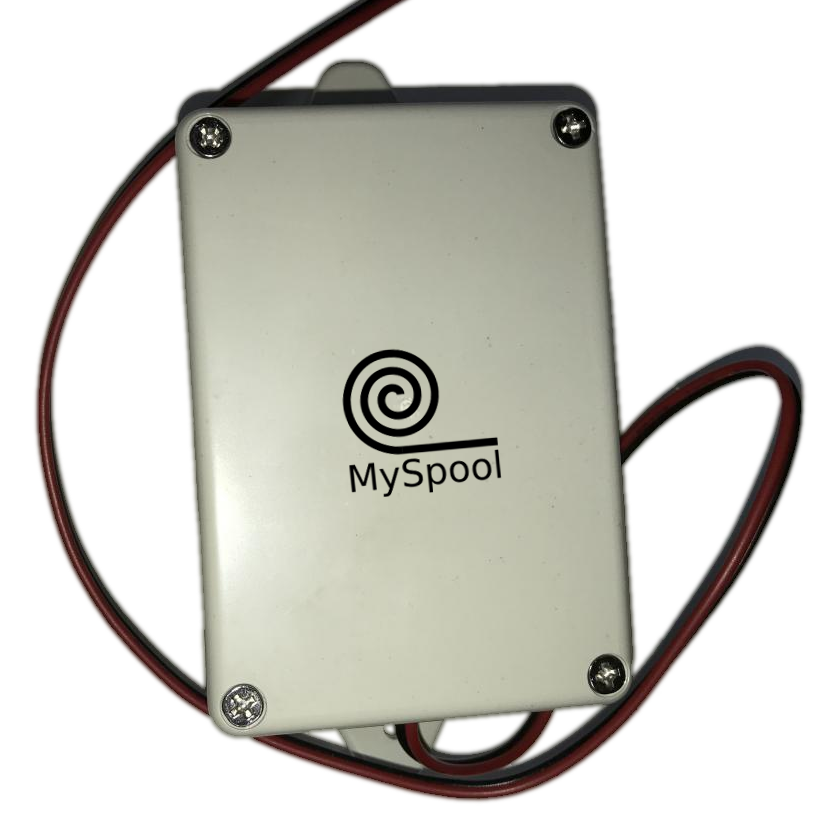
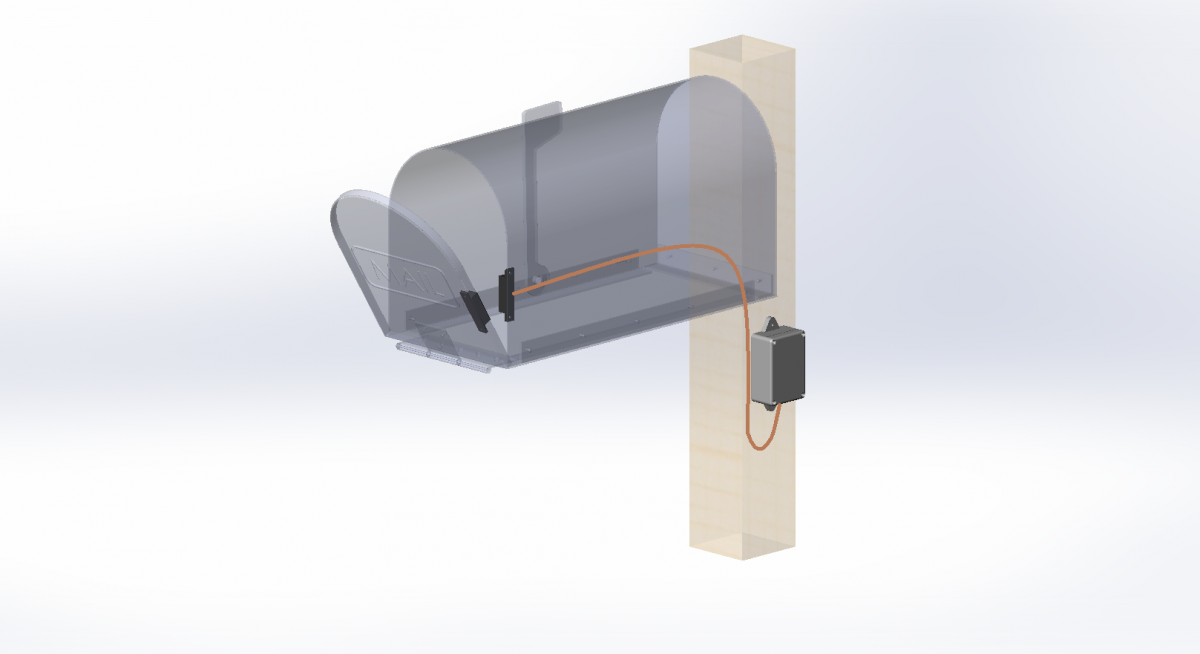
The weatherproof plastic box which contains the MAILBOX Alert is mounted outside the mailbox, on a post. And the door sensor is installed inside, with magnet on the door and the sensor with wires inside the box.
 |
 |
 |
|
Step 1. Use two wood screws included and mount the weatherproof box on a post outside.
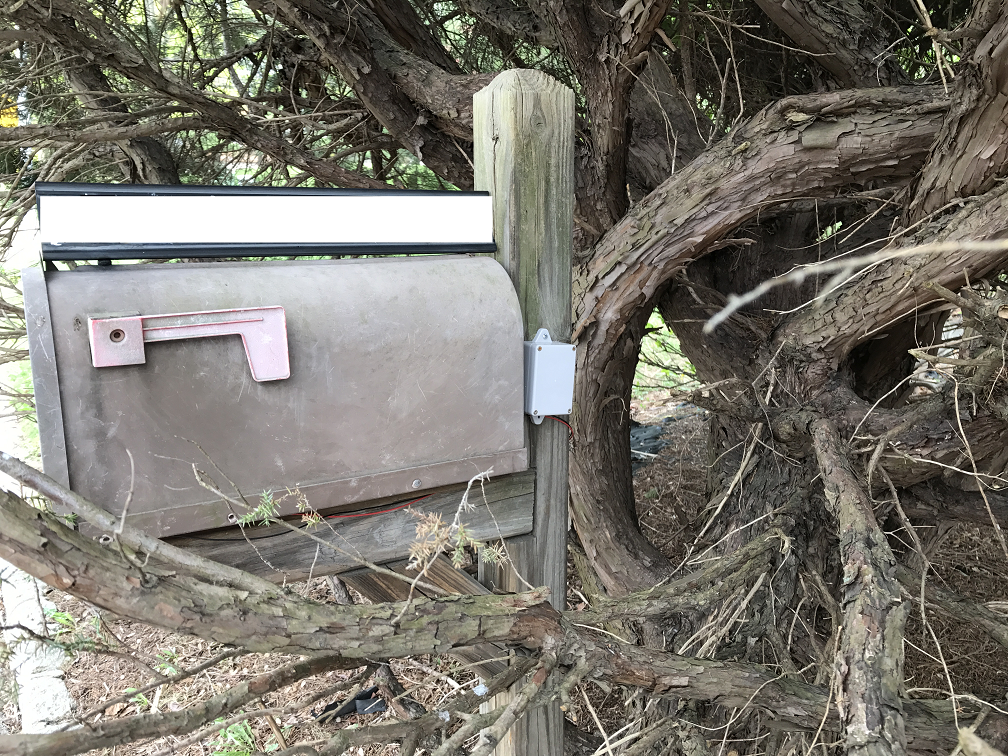
Step 2. Attach the sensor part with wires to the inside of the mailbox: peel off the cover of the sticky tape and position the sensor with the wires facing inside the mailbox. (Note: if you need to thread the wires from inside the box or just trim them, you can cut them as needed and use the included wire nuts to reconnect the cut wires.) Then attach the remaining door sensor part to the door so that the two parts of the sensor get very close to each other when the mailbox is closed:
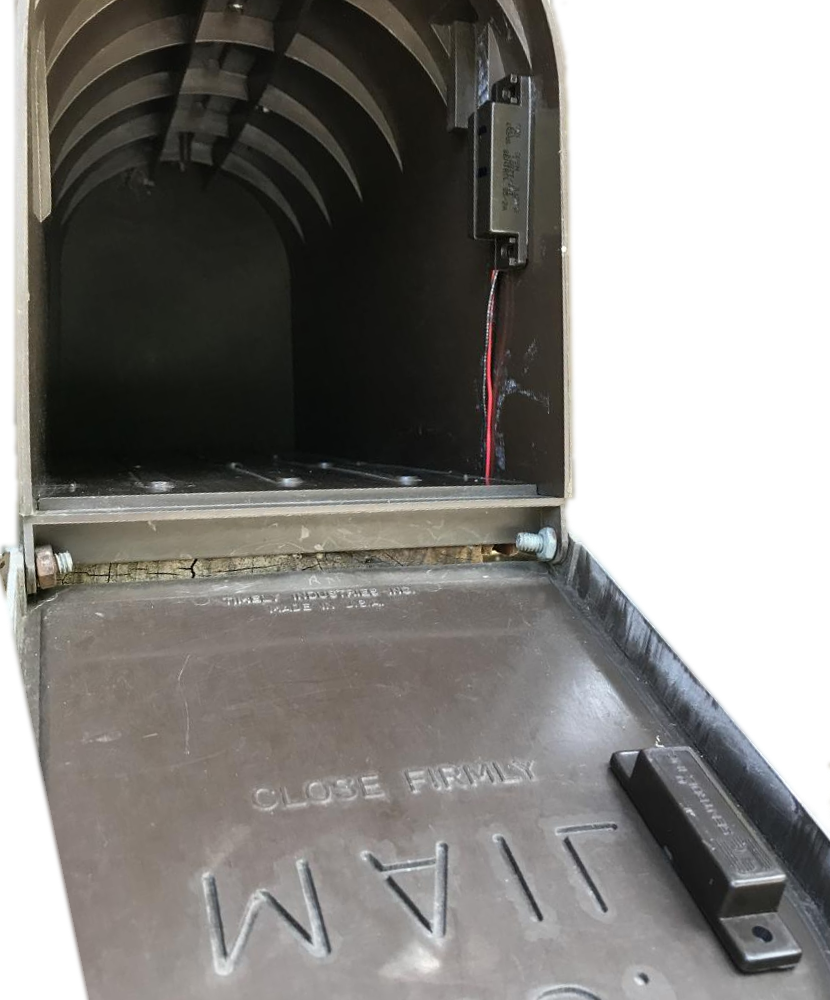
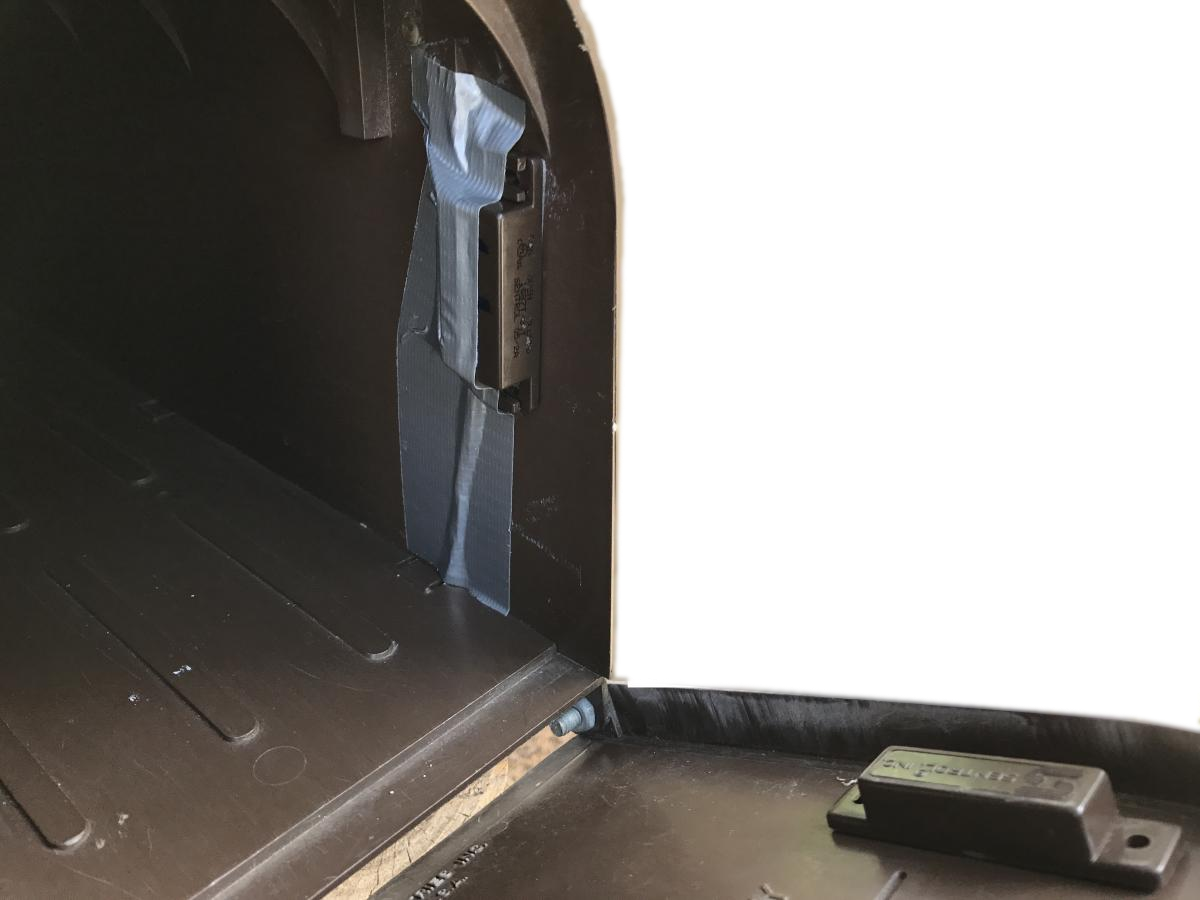
Step 3. You may also want to cover door sensor inside the mailbox with duct tape to make sure the wires or the sensor do not get snagged on anything, as shown here:
To test, close the mailbox door and wait for a few seconds. Then open the door, pause for a second, and close it. You should get an email and a text message show up on your phone in less than a minute. Open the door again to test your MAILBOX Alert. Please remember that the portal limits the number of text messages sent to one every 5 minutes, so you may need to wait for 5 minutes to get a second text message. Your e-mail messages are sent once a minute.
You are holding the Internal MAILBOX Alert in your hands. How do you configure it and install it?
Please CONFIGURE your MAILBOX Alert before you install it. You will need access to internet and your WiFi router's ID and password. Once it has been configured, you can take your MAILBOX Alert outside and INSTALL it.
How to configure MAILBOX Alert
Your new MAILBOX Alert needs to connect to the internet to send its notifications. They will then be forwarded as emails and as text messages to your phone. In order to do that it needs to know which WiFi network to use for communications. Before that, your MAILBOX Alert must be configured with an email and phone number to send notifications.
Be aware that the sensor in the Internal Mailbox Alert is located outside the enclosure. The second part of the sensor, the magnet, is placed on the mailbox door. It is important to have the two aligned, both vertically and horizontally, to ensure long battery life.
When the sensor parts are separated, the device inside is turned on. If it has been configured already to use your WiFi, it will send an alert and turn itself off. If the MAILBOX Alert has not been configured yet, it will enter into a configuration mode so that you can setup your WiFi. In configuration mode the MAILBOX Alert will shut itself off after 30 minutes to save batteries. If you haven't completed your configuration, re-attach the sensor parts for a second. You can then separate them again which will turn the device back on.
Note: we recommend that you connect your device to WiFI, create your account and test notifications before you head outside to installl your device. So follow SETUP INSTRUCTIONS then move on to the installation described below.
How to install the Internal MAILBOX Alert
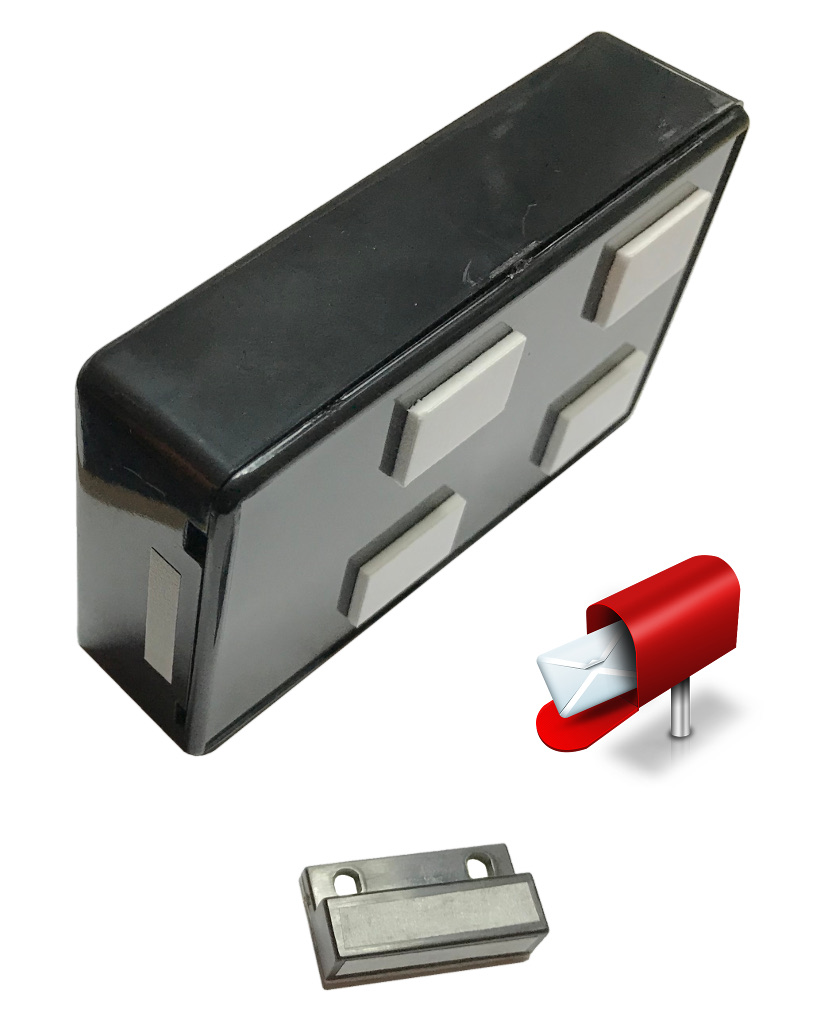
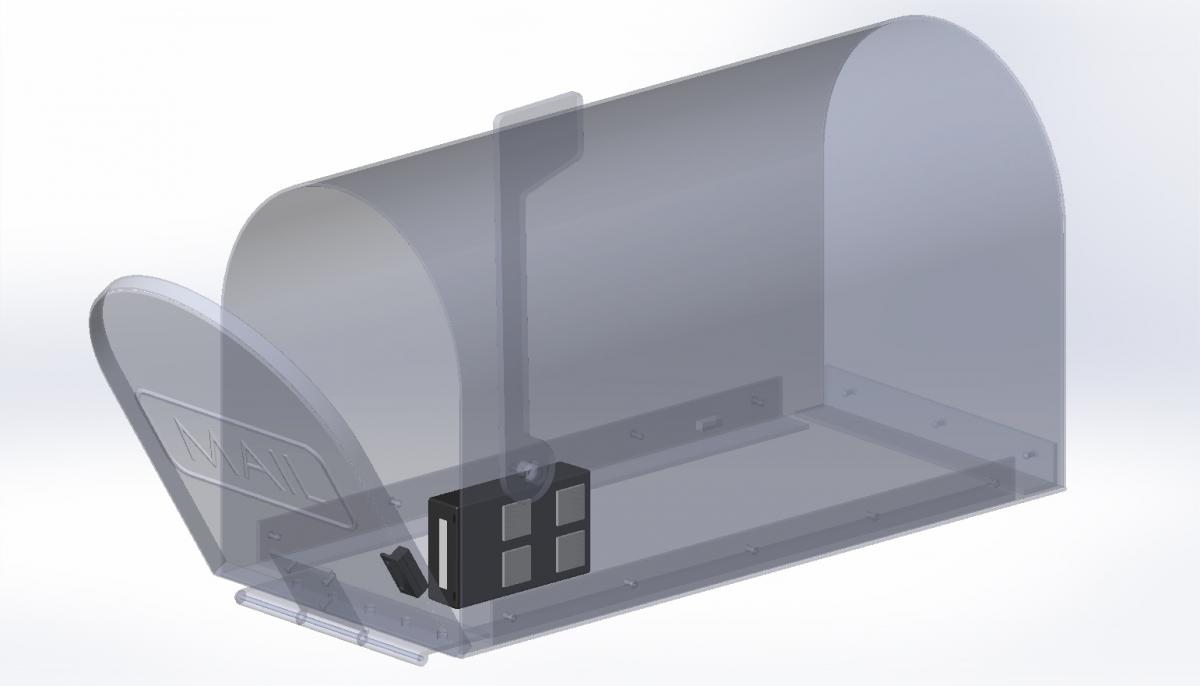
Place the Internal MAILBOX Alert inside the mailbox and attach the magnet to the mailbox door. Align the magnet and the sensor so that they are close to each other when the door is closed. We recommend using masking or scotch tape to hold both the Mailbox Alert and the magnet in place temporarily to get them better aligned. Move them up, down or forward to align them, then affix permanently with included double sided strips or duct tape.
 |
 |
To test, close the mailbox door and wait for a few seconds. Then open the door, pause for a second, and close it. An email and a text message will be sent to your phone in less than a minute.
Open the door again to test your MAILBOX Alert. Please remember that the portal limits the number of text messages sent to one every 5 minutes, so you may need to wait for 5 minutes to get a second text message. Your e-mail messages are sent once a minute.
You are holding MAILBOX Alert Extended Range (ER) in your hands. There are two devices: Mailbox Alert Node and MySpool Hub. How do you configure it and install it?
A. Plug your MySpool Hub - the black box - in an A/C outlet.
B. Connect your Hub to WiFi:
-
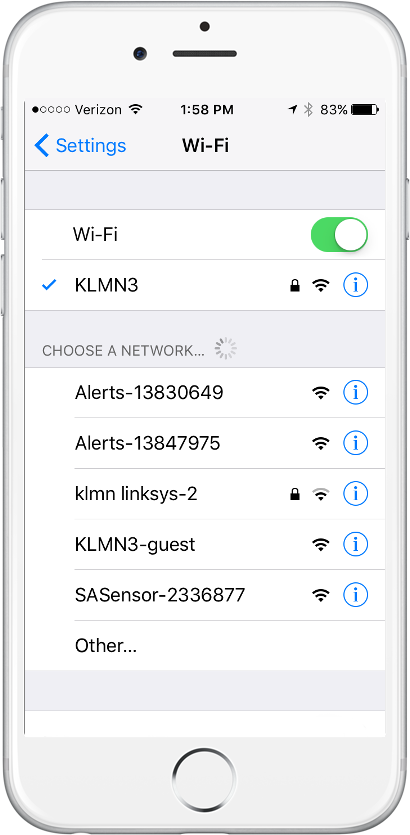 Open your phone, go to Settings, and choose Wi-Fi. Under the CHOOSE A NETWORK tab you will see available networks. One of them will be the MySpool Hub. It will look like SASensor-000000 where "000000" is the unique device ID. In the example on the right it is shown as SASensor-2336877
 -
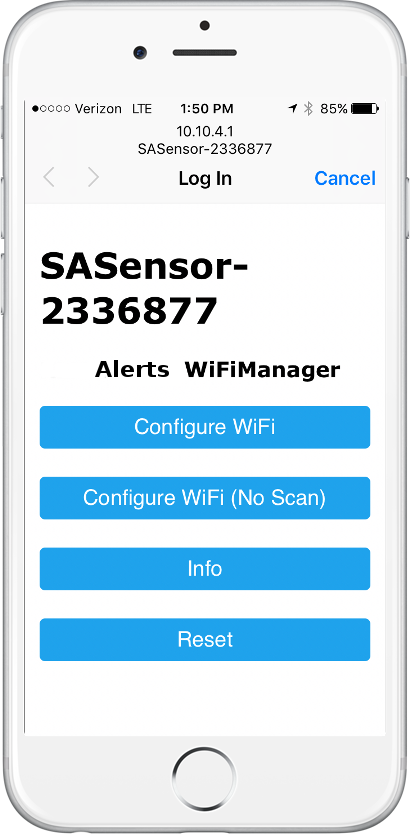 Select SASensor-000000. Once connection is established, which may take 10-15 seconds, it will open a browser window with WiFi Manager. Please note, in case you do not see the WiFi Manager page, you may need to open a browser window and type in an address: 10.10.4.1. The window will look like this:
If you can connect to the SAS network but do not see the WiFi Manager configuration menu, you may need to open a web page at 10.10.4.1. If that page does not open, disconnect from SAS network by going back to Settings and selecting your Home WiFi network. Wait for 5 seconds and re-connect to SAS network. Sometimes it helps to go back to Settings, then click on WiFi again to re-connect.
You may also need to go back to Settings, and connect to your Home WiFi in case you are unable to establish connection with SAS network. This will force your phone to drop the connection and establish a new one. Then connect to SAS network and proceed with WiFi configuration.
-
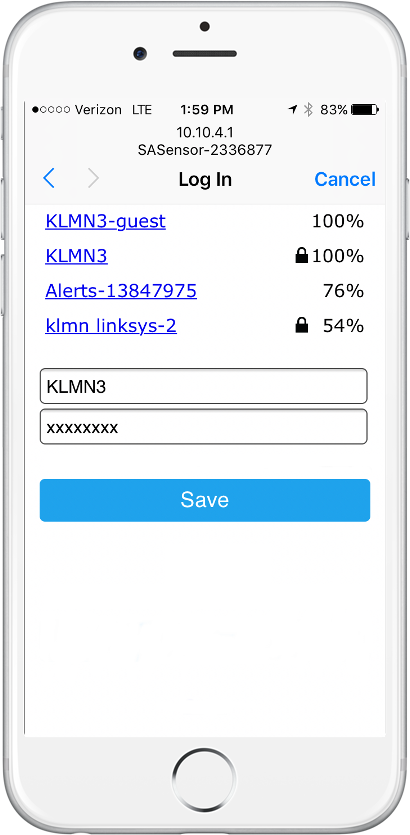 When you select Configure WiFI, you should see the configuration window:
Select your WiFi router and enter it’s password. Please note that some phones will CAPITALIZE the first letter. Make sure your password is entered correctly!
-
Select Save, and return the phone to it’s old WiFI network. Make sure that you see "Credentials Saved" on your phone. Otherwise you may need to perform this configuration process again.
C. Use Registration Code on the included card to create an account at myspool.com and confirm your account (click link in email) OR log out and log back in to your existing account. Also confirm your email subscription to receive alert notifications - check your email and click on the link.
D. Unplug Hub and plug it back in. Wait for 2 minutes for it to update its data.
Send an alert from your Mailbox Node: separate the sensor parts for 2 seconds by two inches or more. You should receive an email asking you to confirm your email subscription. After you confirm your subscription, send another alert. You should receive an email notification. You can now go to device configuration page, add your phone number and change message and other settings.
And if you have any questions or need help with the setup, use the Contact Us link and be sure to include your phone number, we will get back to you promptly.
I have a Mailbox Alert, External mount and I purchased a Mailbox Alert Conversion to Extended Range Kit. How do I install it?
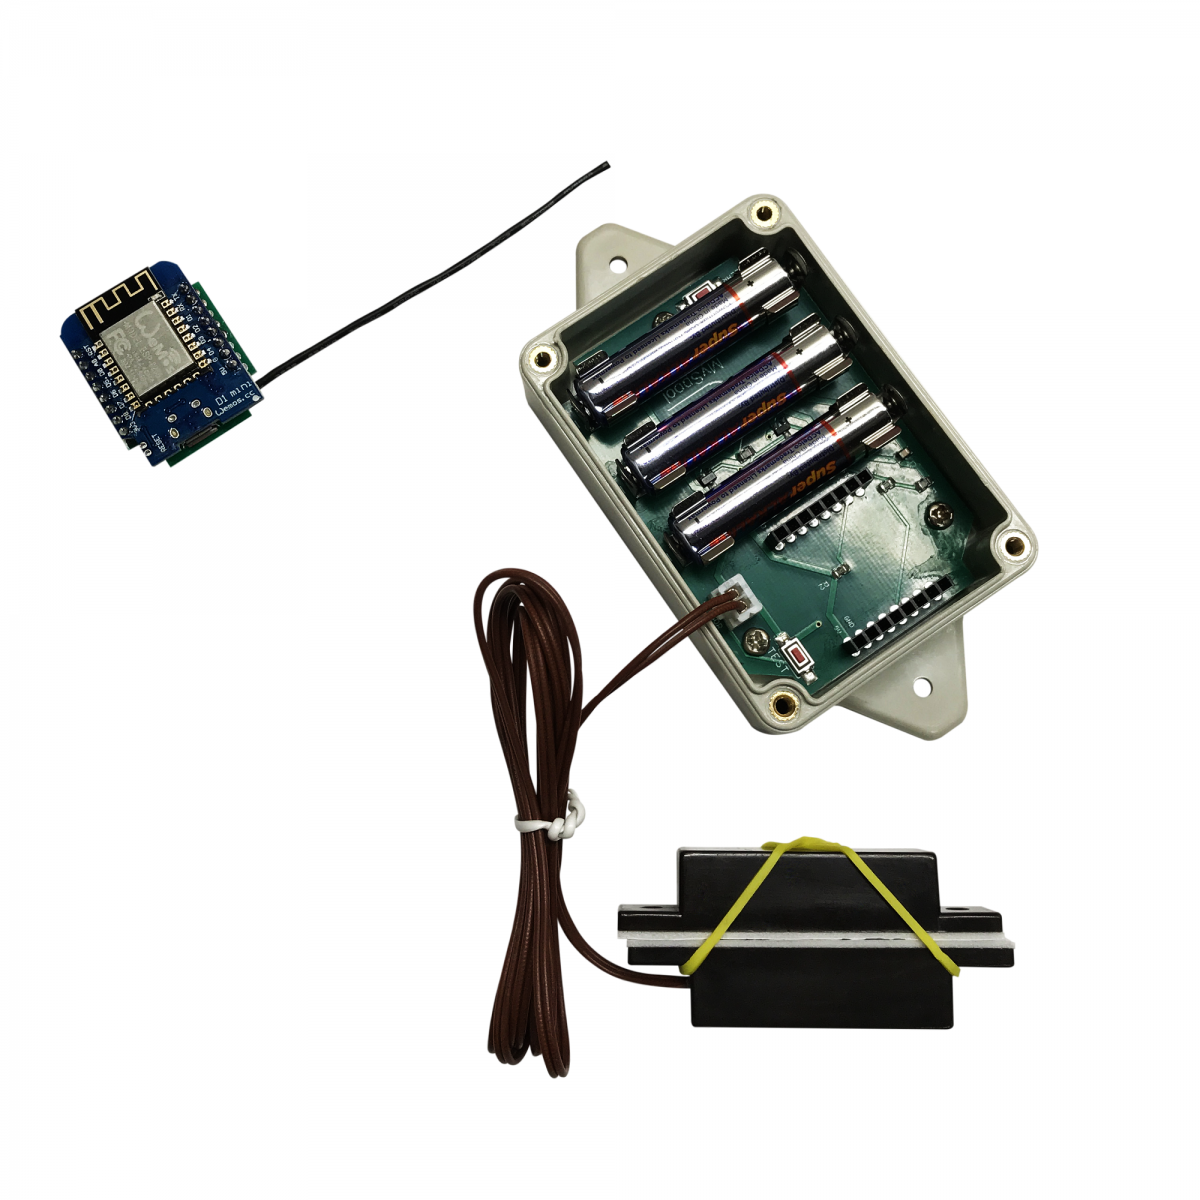
Take the lid off your Mailbox Alert and disconnect the sensor by pulling out the wires from the white connector. Bring the enclosure inside. Pull out one battery. Note how the blue chip is housed, pull it up and replace it with the replacement chip from the kit. Make sure the antenna is fed outside, it should stick out from the slot in the lid where the sensor wires come in. Put the battery back in.
Note 1: To send an alert you can separate the sensor parts for 2 seconds OR press and hold the red button marked TEST or SENSOR for 2 seconds.
Note 2. Since you are performing an upgrade, you already have an account on myspool.com. When you are directed to create an account, you will need to log off and log back in to myspool.com. If your device does not show under MY DEVICES, trigger an alert again, wait for 20 seconds, and refresh your browser.
Now you can configure your MySpool Hub to forward alerts from your Mailbox Alert Node by following these directions.
The Internal Mailbox Alert is mounted inside my mailbox. What is the procedure for replacing the batteries when the remaing charge falls below 20%?
1. Use a flat screwdriver to pry off the entire device using the two slots next to the lid which is attached to the side of the mailbox.
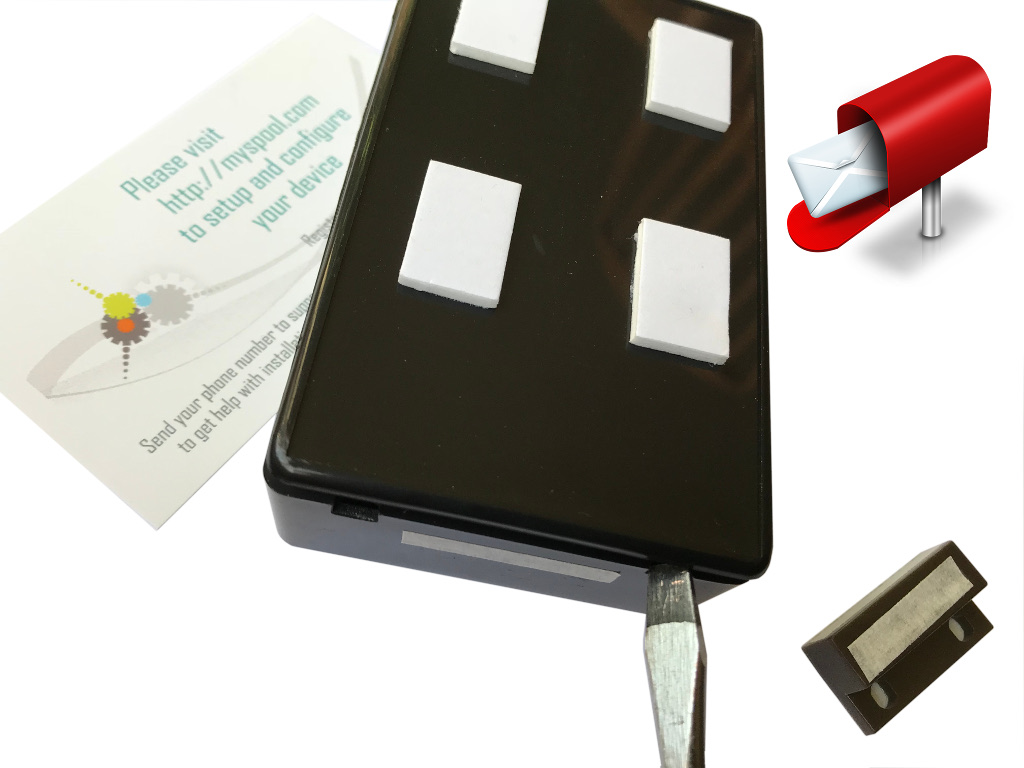
2. Replace the batteries.
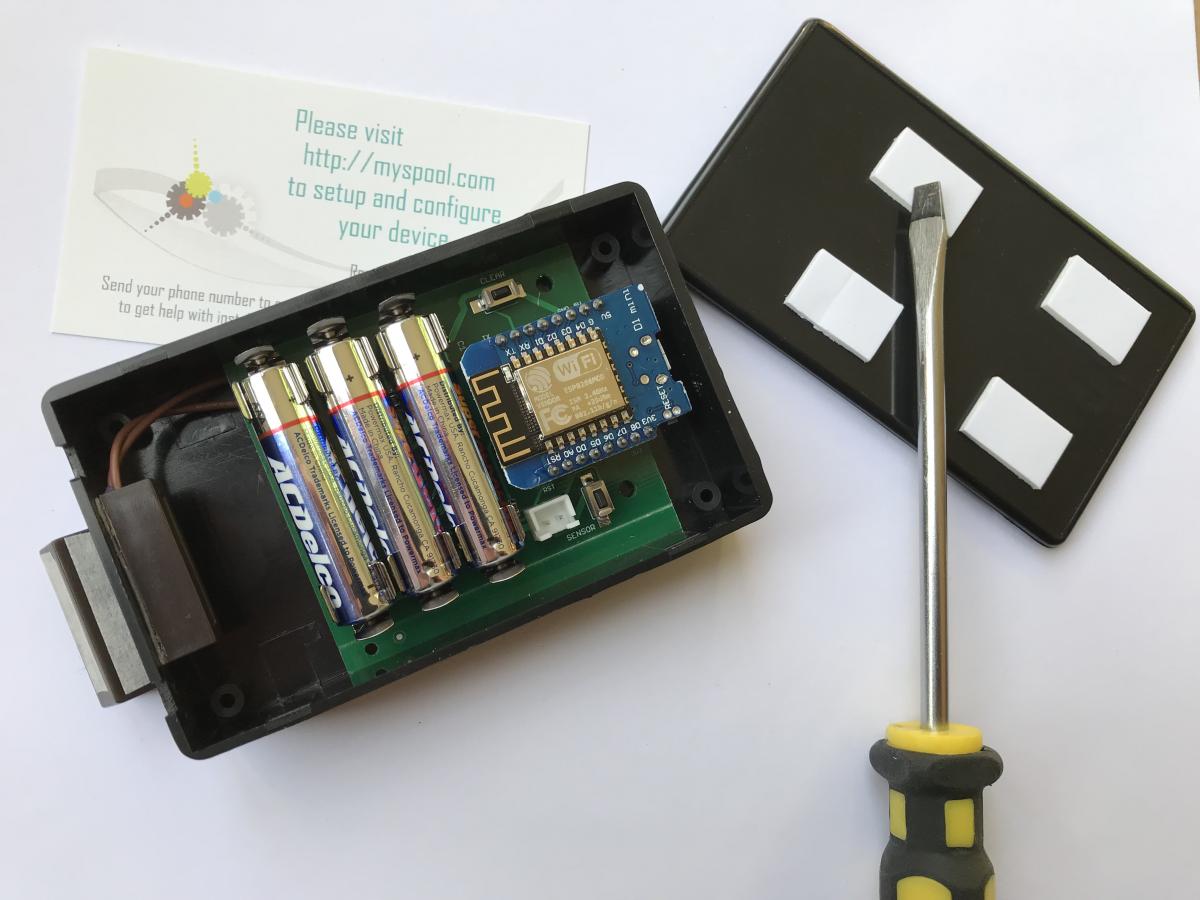
3. Pop the device back in.
Your device is registered with MySpool.com. You have chosen the message it will send, the time when it will be active, and the time zone. What remains is to get your device connected to the internet to send notifications. They will then be forwarded as emails and as text messages to your phone. To begin configuring your MAILBOX Alert, you will need to know your WiFi network name and its password.
Note that the sensor in some of the Internal Mailbox Alerts is located inside the enclosure. In that case it is marked with a white strip. The second part of the sensor, the magnet, has a matching white strip. The two white strips should be almost touching when the mailbox door is closed. Later versions of the Internal Mailbox Alert have the sensor located outside the box and no white tape is required to aid in sensor/magnet alignment. That is the only difference between the two versions.
These instructions apply to both Internal and External Mailbox Alert models.
-
Make sure that the two sensor parts have been attached for at least 5 minutes before you start to configure your WiFi. Separate the door sensor parts for 2 seconds. The magnet part must be at least an inch away from the switch part. This will turn on the MAILBOX Alert and start a 5 minute timer during which you will need to complete the setup. To reset and start again, simply make sure that the door sensor parts are together for 5 minutes. Then start at the beginning of this step.
-
 Open your phone, go to Settings, and choose Wi-Fi. Under the CHOOSE A NETWORK tab you will see available networks. One of them will be the MAILBOX Alert. It will look like SASensor-000000 where "000000" is the unique device ID. In the example on the right it is shown as SASensor-2336877
 -
 Select SASensor-000000. Once connection is established, which may take 10-15 seconds, it will open a browser window with WiFi Manager. Please note, in case you do not see the WiFi Manager page, you may need to open a browser window and type in an address: 10.10.4.1. The window will look like this:
See Note 2 below if you are having problems with this step.
-
 When you select Configure WiFI, you should see the configuration window:
 -
Select your WiFi router and enter its password. Please note that some phones will CAPITALIZE the first letter. Make sure your password is entered correctly!
-
Press Save, and return the phone to its old WiFI network. Make sure that you see "Credentials Saved" on your phone. Otherwise you may need to perform this configuration process again.
To test your device separate the door sensor parts for 2 seconds. Once you have registered your MAILBOX Alert, you should get an email and a text message. Please remember that the portal limits the number of text messages sent to one every 5 minutes. So you may need to wait for 5 minutes to get a second text message. Your mail messages have no such restrictions.
Note 1: when a MAILBOX Alert is configured with a new phone number, the first alert is used for validation. Send another alert after 5 minutes to receive your first text message as a test.
Note 2: if you can connect to the SAS network but do not see the WiFi Manager configuration menu, you may need to open a web page at 10.10.4.1. If that page does not open, disconnect from SAS network by going back to Settings and selecting your Home WiFi network. Wait for 5 seconds and re-connect to SAS network. Sometimes it helps to go back to Settings, then click on WiFi again to re-connect.
You may also need to go back to Settings, and connect to your Home WiFi in case you are unable to establish connection with SAS network. This will force your phone to drop the connection and establish a new one. Then connect to SAS network and proceed with WiFi configuration.
If you need to reset your MAILBOX Alert to the factory settings or simply need to re-configure it to use another WiFi router, you need to erase old WiFi information first. How is it done?
If you need to move the MAILBOX Alert to another location or simply need to re-configure it to use another WiFi router, follow the procedure below.
- remove the cover from the MAILBOX Alert
- open the mailbox door or simply take magnet away from the sensor
- remove one battery
- press and hold the Clear button inside of the MAILBOX Alert enclosure
- put the battery back in
- release the Clear button when you see a steady blue light
- connect your MAILBOX Alert to you wifi as described here
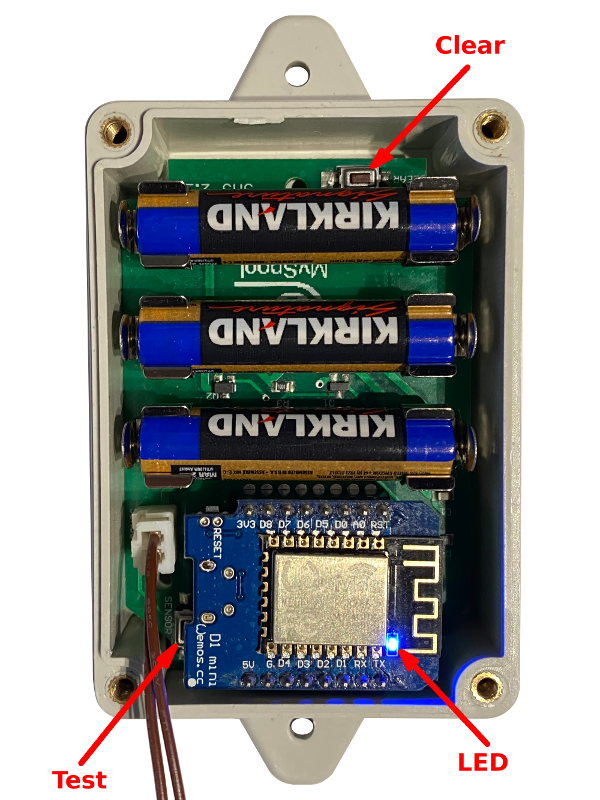
If you need to reset your MAILBOX Alert Extended Range to the factory settings or simply need to re-configure it to use another WiFi router, you need to erase old WiFi information first. How is it done?
Suppose you must move your MAILBOX Alert Extended Range Set to another location or re-configure it to use another WiFi network. In that case, you need to delete the information already stored there.
To do that, unplug the extender from the power outlet. Using a flat screwdriver or a dull knife, pry open the device enclosure using a slit through which wires to the sensor are coming from. Press and hold the CLEAR button while you plug the device into the power outlet. Hold the button for 15 seconds, and after that, you should see a steady blue light on the blue circuit board, indicating that the device is ready to be configured with a new WiFi network.
Your device has now been cleared and can be unplugged and moved to another location or re-configured to use another WiFi network.
If you stopped receiving notifications you need to troubleshoot your MALBOX Alert Extended Range. How is it done?
- make sure the extender is plugged in, connected to your WiFi, and has green status on "My Devices" page
- remove cover from the remote unit
- remove 3xAAA batteries
- unplug the sensor wire (1)
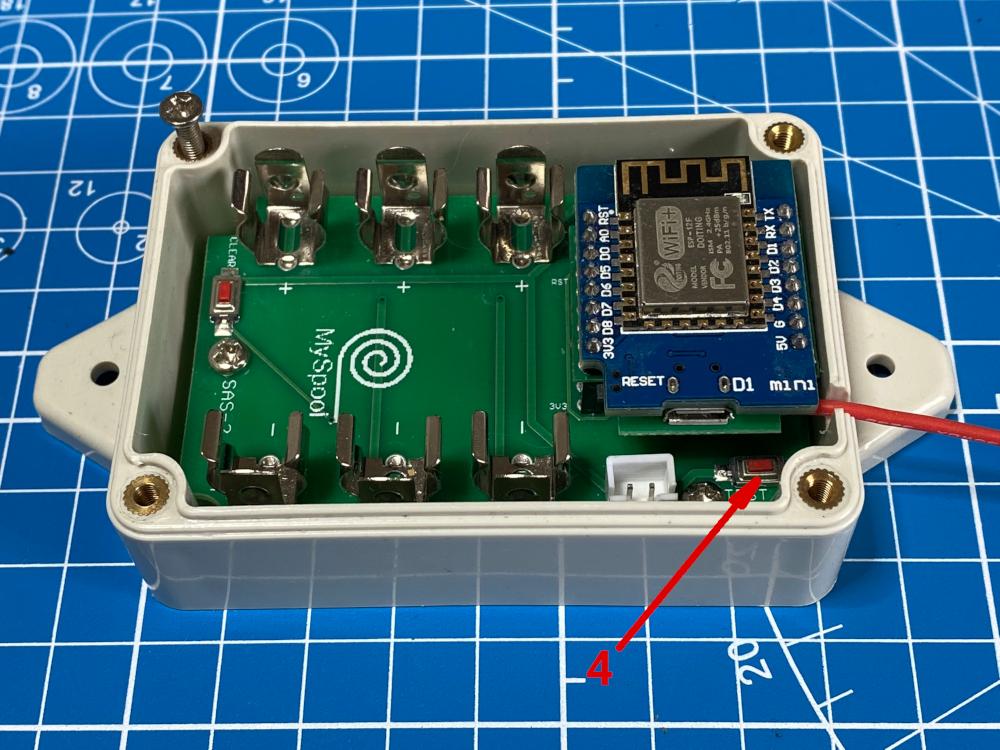
- gently bend battery clips (2) towards each other as shown on the image below
- push the main processor (3) with your thumb all the way into the socket on the main board
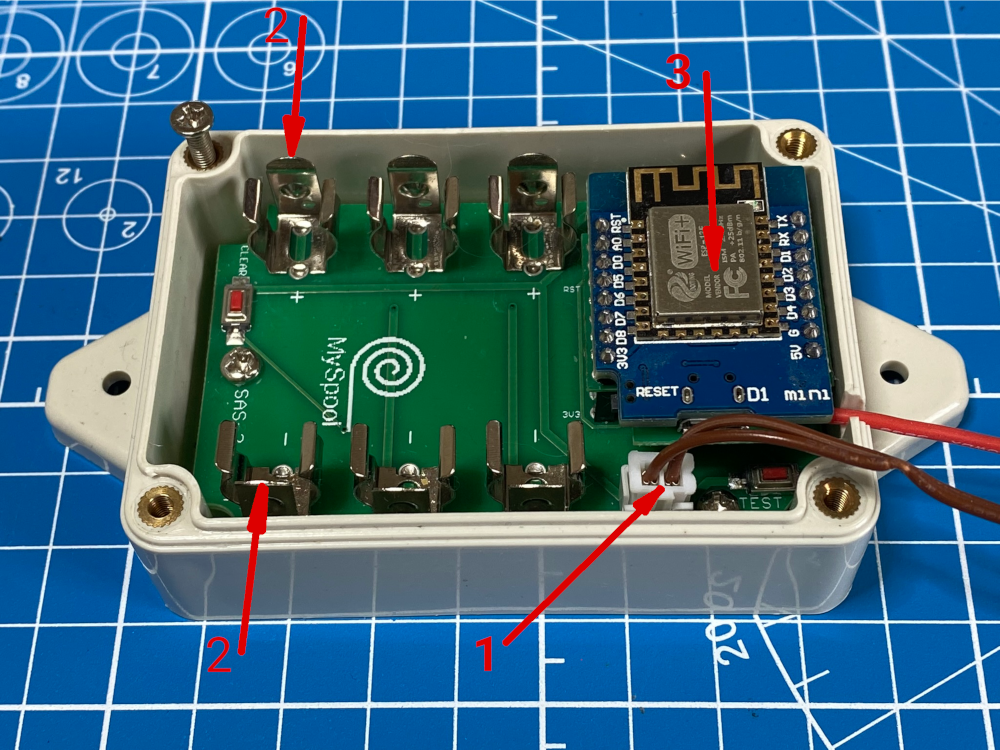
- reinstall 3 new AAA
- press the "Test" button (4) for 2 sec
- check your email/phone for a notification
- put magnet and sensor next to each other
- plug the sensor wire (1) back into connector on the main board
- separate magnet and sensor for 2 sec
- check your email/phone for a notification
Get back to us with the results of troubleshooting if required
