
You are here
Frequently Asked Questions - General
To have a text message alert sent to a telephone, use your carrier's Email-to-SMS gateway by adding one or more email addresses to be forwarded as text. For example, add 5551234567@vtext.com as an email address to receive a text message on a verizon cell phone number 5551234567. For a full list of such gateways please refer to the table below. And be sure to test your entry before adding it to your device configuration: send an email to `your phone`@`your gateway` and make sure that you receive it as a text message..
Note: both Amazon and Mobile carriers punish us for sending alerts to invalid addresses. To avoid that, we will permanently block an email that comes back to us from your carrier as 'blocked'. So please do test your entry as described above!
Do not add '1' before your area code for US and Canadian carriers.
Note that some carriers prioritize these messages lower than standard text messages, so it may take longer for your message to go through. You can add up to 5 email addresses to your MySpool device configuration. To update your device configuration, login to myspool.com and click on MY DEVICES menu. Then click on Configure Device link for your device.
| Cell Carrier | Email-to-SMS gateway |
| Alaska Communications | msg.acsalaska.com |
| AT&T Wireless | txt.att.net |
| Bell Mobility | txt.bell.ca |
| Bell MTS | text.mts.net |
| Bluegrass Cellular | sms.bluecell.com |
| Boost Mobile | myboostmobile.com |
| Cellcom | cellcom.quiktxt.com |
| Chatr | pcs.rogers.com |
| Consumer Cellular (AT&T) | mms.att.net |
| Consumer Cellular (T-Mobile) | mailmymobile.net |
| Cricket | mms.cricketwireless.net |
| C Spire | cspire1.com |
| Digicel St. Lucia | digitextlc.com |
| Eastlink Canada | mms.eastlink.ca |
| Fido | fido.ca |
| Freedom Mobile | txt.freedommobile.ca |
| FreeUP Mobile | txt.att.net |
| GCI | mobile.gci.net |
| Good2Go Mobile | txt.att.net |
| Google Fi | msg.fi.google.com |
| Google Voice | Not an actual carrier |
| GreatCall | vtext.com |
| H2O Wireless | txt.att.net |
| IV Cellular (Illinois Valley Cellular) | ivctext.com |
| Koodo Mobile | msg.koodomobile.com |
| Metro PCS | mymetropcs.com |
| Mint Mobile | tmomail.net |
| NET10 | Determine NET10's carrier |
| Nex-Tech | sms.nextechwireless.com |
| Page Plus | vtext.com |
| PC Mobile | mobiletxt.ca |
| Pioneer Cellular | zsend.com |
| Pure TalkUSA | txt.att.net |
| Republic Wireless | text.republicwireless.com |
| Rogers Wireless | pcs.rogers.com |
| SaskTel | sms.sasktel.com |
| SIMPLE Mobile | mmst5.tracfone.com |
| Solo Mobile | txt.bell.ca. |
| Spectrum Mobile | vtext.com |
| Sprint | messaging.sprintpcs.com |
| Straight Talk | Determine Straight Talk's carrier |
| STRATA Networks | rinasms.com |
| Telus Mobility | msg.telus.com |
| Ting (CDMA devices) | message.ting.com |
| Ting (GSM devices) | tmomail.net |
| T-Mobile | tmomail.net |
| Tracfone | Determine Tracfone's carrier |
| Twigby | messaging.sprintpcs.com |
| Ultra Mobile | mailmymobile.net |
| Union Wireless | mms.unionwireless.com |
| US Cellular | email.uscc.net |
| Verizon | vtext.com |
| Viaero | viaerosms.com |
| Virgin Mobile | vmobl.com |
| Virgin Mobile Canada | vmobile.ca |
| Xfinity Mobile | vtext.com |
If your cell carrier is not listed above, try entering your phone number at freecarrierlookup.com.
Carrier specific help: Verizon
My WiFi network has changed (I received a new router, I moved, changed internet provider, etc.) How do I re-connect my device?
First of all, we always recommend that if it is at all possible, write down you network name and password and then rename your new router and re-use the password. It is much easier than re-programming and re-connecting all devices that use your WiFi network at home.
If it is not an option, then follow the instructions described under 'How to move my device?':
- Water Alert
- Float Sensor device
- Water and Temperature Alert
- Mailbox Alert
- Gas Alert
- Gas/CO Alert
- CALLME Button
- Alert Button
- Temperature Alert
- Power Failure Alert
- P3 Power Failure Multi-sensor Alert
- P4 Power Failure Multi-sensor Alert
I added my email address to the device configuration but do not get email alerts, how do I fix that?
We are using Amazon Cloud service to send email notifications. This service requires that your request to receive such notifications is confirmed. Look for an email with the subject "AWS Notification - Subscription Confirmation", open it and click on the link provided to confirm your subscription. It is a one-time action that is required for every new email address added.
If you cannot find this email, look in your Spam and Trash folders. You can always remove and then add an email address, a subscription confirmation request will be sent again.
Note that this is a free service provided by MySpool to owners of our devices.
I already have one or more MySpool devices. How do I add another one so that it shows up under My Devices?
First, connect your phone/tablet/computer to the same WiFi as you are connecting your new device to and login to myspool.com. If you are already logged in then logout and log back in.
Then follow SETUP INSTRUCTIONS with one change: skip the step that instructs you to create an account. Refresh your browser window instead to make sure that your new device appears under My Devices.
All MySpool devices are subject to notification throttling. This is done for two reasons: one is to prevent flooding communications with unnecessary messages. And the second one is to save us some money: we have to pay for every text message!
Each device is allotted a number of text messages per month. In case of repeating alerts within a certain interval, that interval will be increased. When the issue has been resolved, the alert interval will be reset back to the original 5 minutes.
Here are the details on how the text interval is managed:
-
The first two messages are sent at 5 minute intervals
-
If there is an alert that comes within 5 minutes of the previous one, the alert interval is increased to 15 minutes
-
After that, if there is an alert that comes within 15 minutes of the previous one, the alert interval is increased to 30 minutes
-
After that, if there is an alert that comes within 30 minutes of the previous one, the alert interval is increased to 60 minutes
-
And the next alert that will indicate that no action has been taken will cause the alert interval to increase to 6 hours. It will stay there until the break between alerts is over 6 hours which will reset it back to 5 minutes.
This will limit the number of messages sent when someone leaves a water alert in a cup of water for testing and leaves it there for a few days - as has been known to happen!
There is one critical caveat to this formula: we understand that an initial setup and testing period is important. So this throttling takes effect 24 hours AFTER your device has been ADDED. This gives our users a day to configure and test their devices without imposing any throttling!
 1. Activate your device:
- CALLME Button: Press and hold the button for 2 seconds.
- GAS Alert: Plug it in. Tap the SELF-TEST button TWICE.
- MAILBOX Alert: Separate the sensor parts for 2 seconds by two inches or more.
- MAILBOX Alert Extended Range: plug your hub in an A/C outlet
- WATER Alert: Plug it in. Dip the sensor pad in a cup of water for 30 seconds. Wipe it dry.
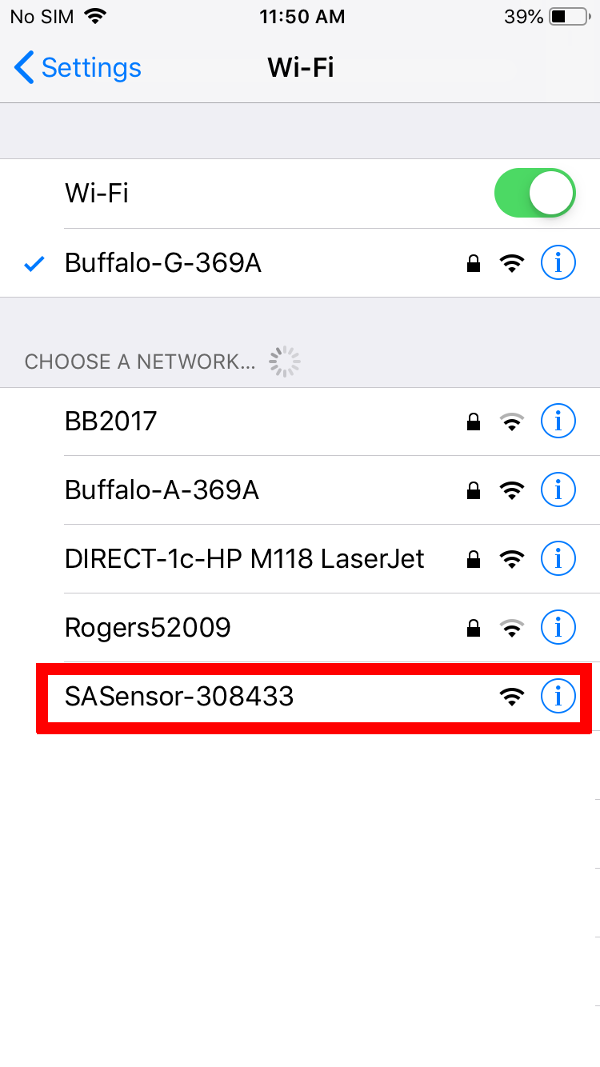
Open your phone, go to Settings, and choose Wi-Fi. Under the CHOOSE A NETWORK tab you will see available networks. One of them will be your device. It will look like SASensor-000000 where "000000" is the unique device ID. In the example on the right it is shown as SASensor-308433. It may take up to 30 seconds for the SAS network to become visible on your phone or a laptop.
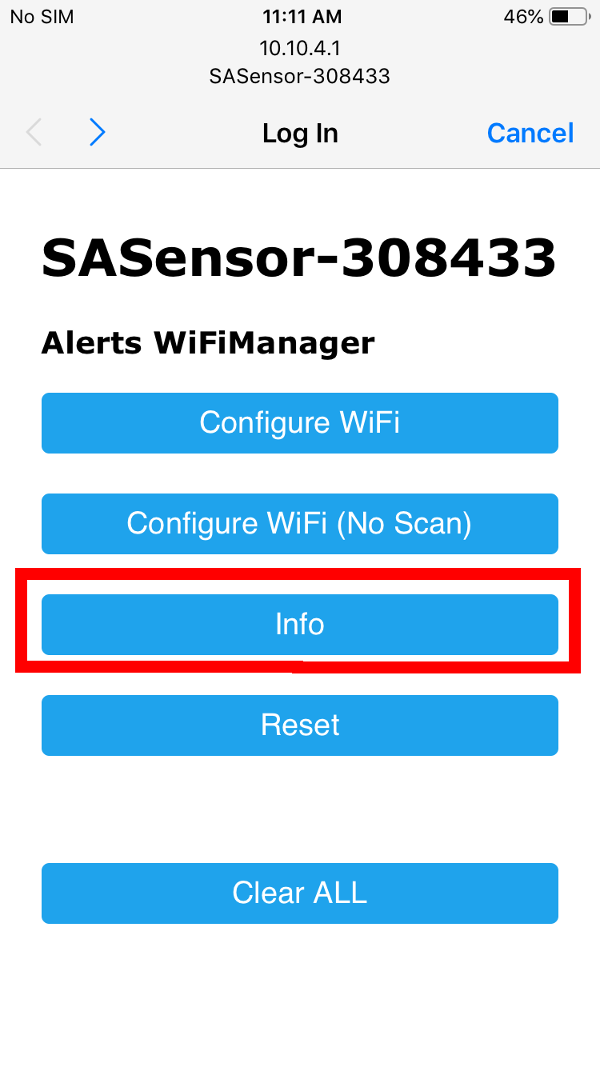 2. Select SASensor-000000. Once connection is established, which may take 10-15 seconds, it will open a browser window with WiFi Manager. Please note, in case you do not see the WiFi Manager page, you may need to open a browser window and type in an address: 10.10.4.1. The window will look like this.
Tap on "Info" when the blue and white menu comes up.
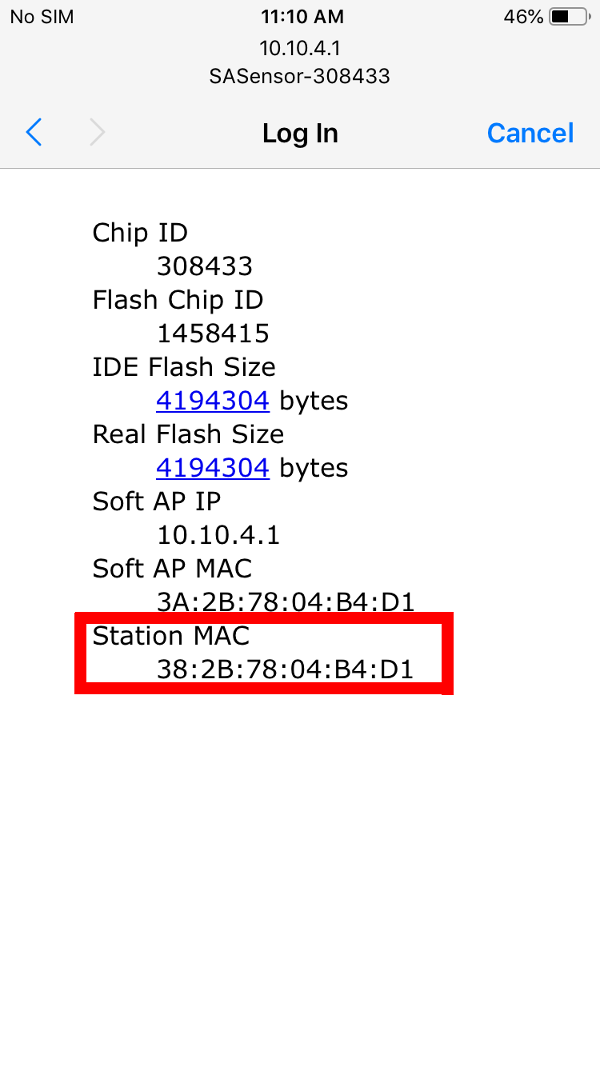 3. On the Info page you will see the MAC address of your device under Station MAC
If you have a multi-sensor device, you will notice that sometimes only one sends a notification. This may be seen when using a Dual Water, Water and Temperature, or a Multi-Sensor DIY board. Is there a reason for that?
There is a good reason for that. Each device checks sensors in a certain order. Water sensors have the highest priority so they are checked first. In the case of the Dual Water sensor scenario, sensor number one is checked first. If there is an alert to be sent by that water sensor, it gets sent. Then the throttling kicks in: every device will send no more than one alert per minute to the cloud. From there it will be sent on as SMS, email or pushbullet. So regardles of what the other sensors are showing, their alerts will be delayed for up to one minute - and then sent only if the first water sensor is dry.
So if your deployment scenario calls for two sensors of the Dual Water Alert to indicate critical water level notifications, it is recommended that Sensor Two is placed at a lower level than Sensor One.
When using Water and Temperature sensors, be aware that a wet water sensor will send an alert and may cause the temperature sensor alert to be delayed until the water sensor is dry.
I connected to the SAS network and entered my WiFi password. Now I can not see it on my phone anymore. Why?
The SAS network is visible only when your device does not know how to connect to your WiFi. Once you specify that information, for security reasons the configuration part of your device is no longer displayed. If you want to use a different WiFi network, you will need to clear your device first. See the FAQ section for your device on how to move your device to another location for detailed instructions.
I have an iPhone. How do I check my WiFi network strength and verify that MySpool devices can use it?
Here is the procedure to setup AirPort Utility and check your network strength:
1. Install https://apps.apple.com/us/app/airport-utility/id427276530
2. Do not launch application yet
3. Go to Settings -> AirPort Utility and enable "Wi-Fi Scanner"
4. Go to your deployment location and launch AirPort Utility
5. In the top right corner tap "Wi-Fi Scan"
6. In the top right corner tap "Scan"
7. Find your 2.4 GHz network in the list of networks and read the RSSI value. Your device will work with a network showing a value greater than -70dBm
Note: if you have an android phone, install "Wifi Signal Meter" app from the Play Store. When it is installed, connect your phone to your 2.4GHz network, go to your deployment location and launch "Wifi Siignal Meter". You should see signal strength when the app starts.
I have an Android device. How do I check my WiFi network strength and verify that MySpool devices can use it?
Here is the procedure to setup AirPort Utility and check your network strength:
- install WiFi Analyzer from the Google Play
- launch the application (marked with red square)
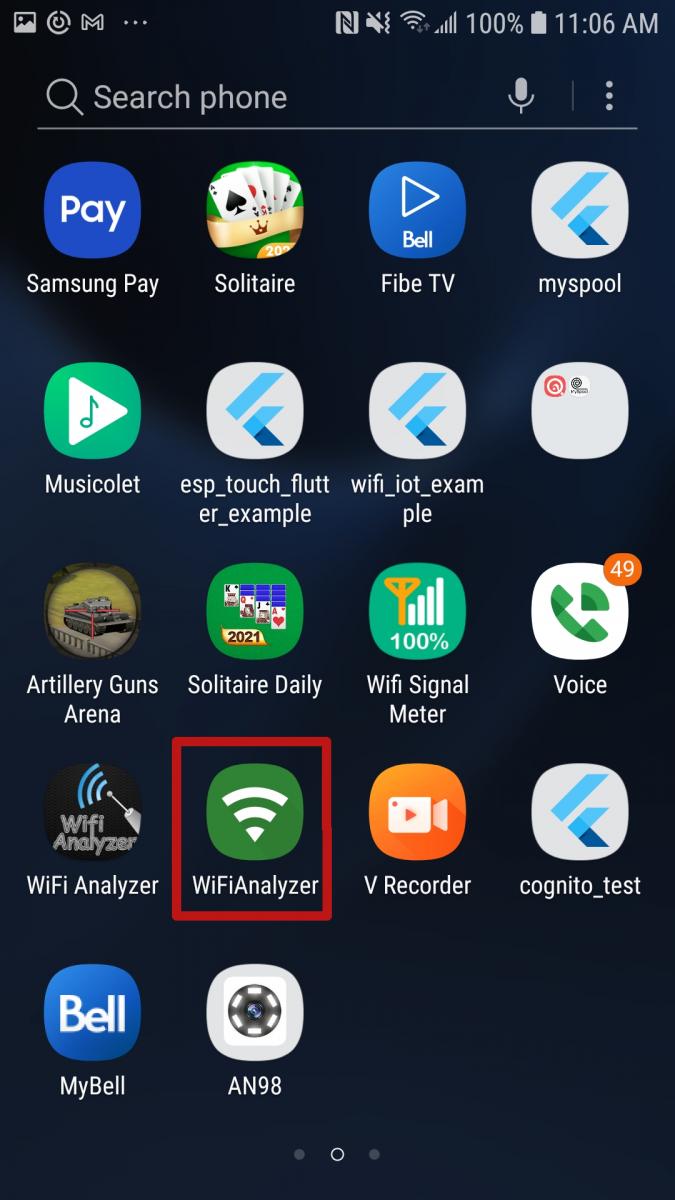
- get your phone as close to your device as possible. Find your 2.4 GHz network in the list of networks and read the RSSI value. Your device will work with a network showing a value greater than -70dBm

Login to your account at myspool.com, click on Configure Device and remove your email address from the first line Email address for notifications. Scroll down and hit Save.
Then click on Configure Device again and enter your email address again. Click Save.
Check your email, find one with subject AWS Notification - Subscription Confirmation, open it and click on the Confirm subscription link.
I configured my device by selecting a WiFi network and entering its password but it is still showing under available networks even after 5 minutes. I understand that after having been configured, it should disappear in a few minutes. Why is that happening?
Sometimes the initial handshake between your device and your router is taking longer than expected. This results in devices not saving network name and password. When this happens follow the steps below to connect your device to your WiFi
- Write down the name of your network. You will have to enter it manually in Step 5. If you have one network name for both 5 GHz and 2.4GHz bands, write this name down, otherwise write down the network name that corresponds to the 2.4GHz band. Remember that network name is case sensitive so note which letters are in uppercase and which are in lowercase.
- Double-check your password. Password is also case sensitive. If it starts with a lowercase letter make sure you enter it correctly as your phone will most likely make the first letter upper case.
- Connect your phone/tablet/computer to SASensor-##### network
- When you see Alerts WiFi Manager on your screen, click on the "Configure WiFi No Scan" button
- Enter your network name from Step 1 into the SSID box and password into the password box. Click the "Save" button
- Your device will save your entry, reboot, and try to connect to your router. If the information entered in Step 4 is correct your device will connect to your router within a minute.
These directions are written with screen shots taken off a laptop. Please be aware that if you are doing this on a smart phone your screen will look different. The process flow is the same.
On the right side of the home screen on myspool.com, under User Login section, click on the link Create new account. 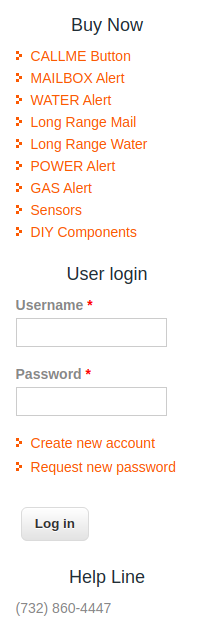
After you click on that link, you will see a screen that look like this: 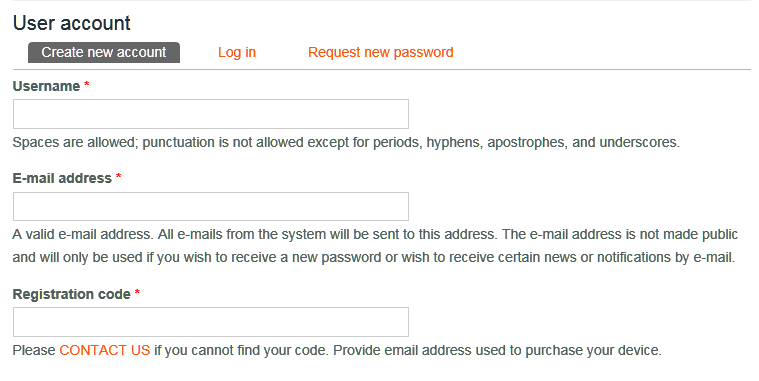
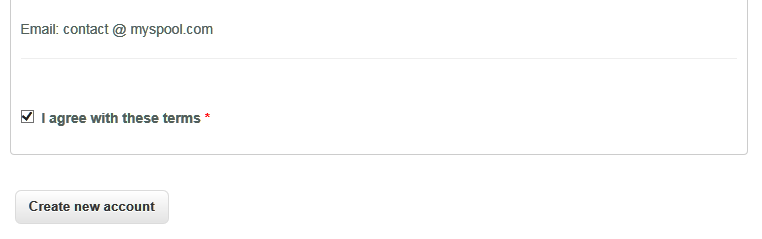
Enter your email in two places, for user name and E-mail address. Then enter your Registration Code. Read the Terms of Use and scroll down to the bottom of the page, check the box that says 'I agree with these terms' and click Create new account
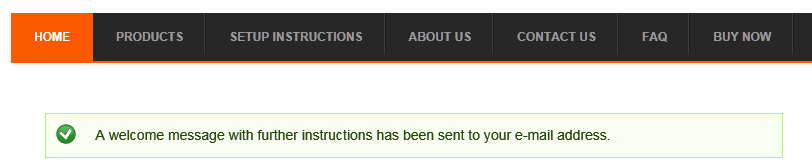
You should then see a message that looks like this:
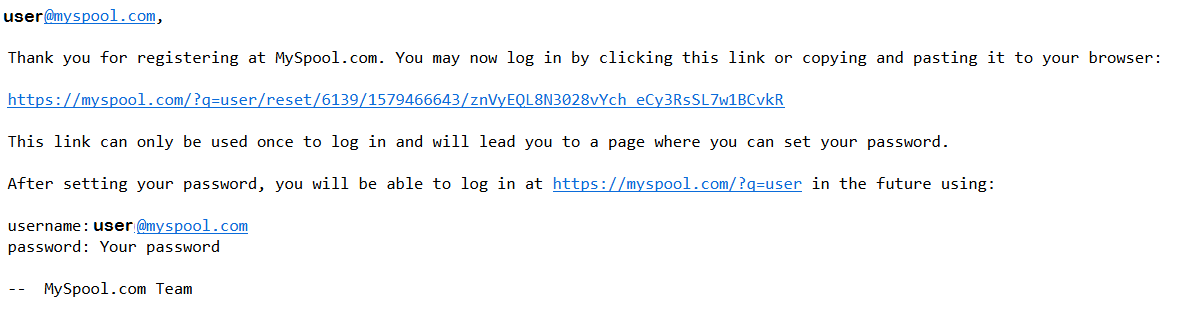
Check your email and find one from myspool.com with the subject "Account details for your email address at MySpool.com." Click on the first link in that email:
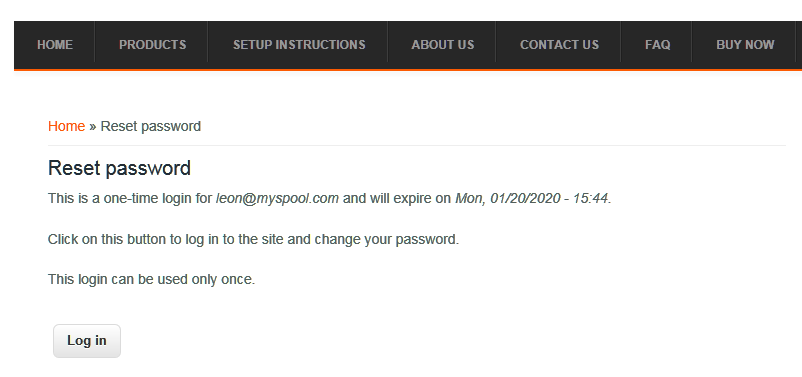
When you click on the link in the registration email, you will see a screen that looks like this:
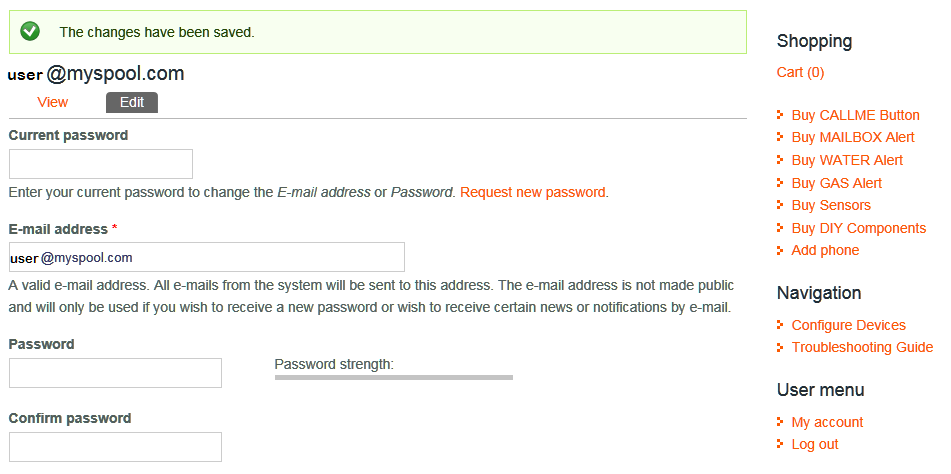
Click on the Log in button. You will see a screen where you will need to enter your email address and a password, twice, as well as your Registration Code. It will look like this:

When you click Save, you will see a page with a line that confirms account creation:
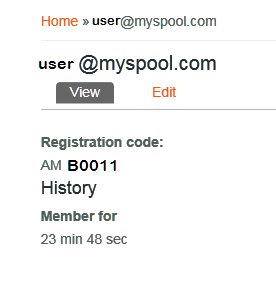
Click on the link under User Menu, My account to confirm, you will see your account information that looks like this:
Now you can click on MY DEVICES and configure your devices.