How to setup your MAILBOX Alert to use your WiFi?
Your device is registered with MySpool.com. You have chosen the message it will send, the time when it will be active, and the time zone. What remains is to get your device connected to the internet to send notifications. They will then be forwarded as emails and as text messages to your phone. To begin configuring your MAILBOX Alert, you will need to know your WiFi network name and its password.
Note that the sensor in some of the Internal Mailbox Alerts is located inside the enclosure. In that case it is marked with a white strip. The second part of the sensor, the magnet, has a matching white strip. The two white strips should be almost touching when the mailbox door is closed. Later versions of the Internal Mailbox Alert have the sensor located outside the box and no white tape is required to aid in sensor/magnet alignment. That is the only difference between the two versions.
These instructions apply to both Internal and External Mailbox Alert models.
-
Make sure that the two sensor parts have been attached for at least 5 minutes before you start to configure your WiFi. Separate the door sensor parts for 2 seconds. The magnet part must be at least an inch away from the switch part. This will turn on the MAILBOX Alert and start a 5 minute timer during which you will need to complete the setup. To reset and start again, simply make sure that the door sensor parts are together for 5 minutes. Then start at the beginning of this step.
-
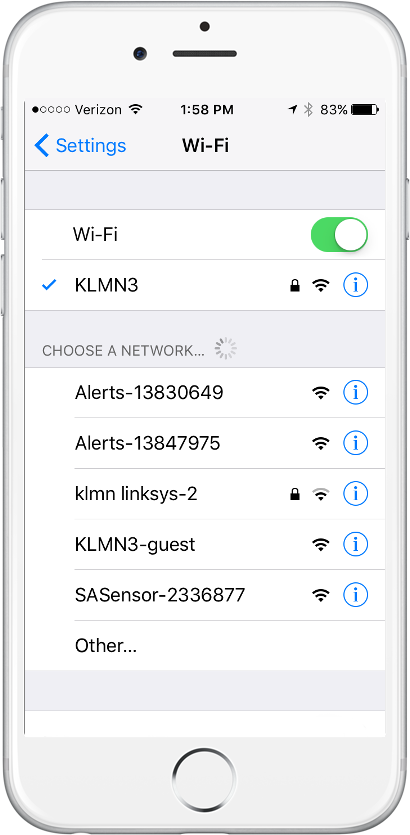
 Open your phone, go to Settings, and choose Wi-Fi. Under the CHOOSE A NETWORK tab you will see available networks. One of them will be the MAILBOX Alert. It will look like SASensor-000000 where "000000" is the unique device ID. In the example on the right it is shown as SASensor-2336877
 -
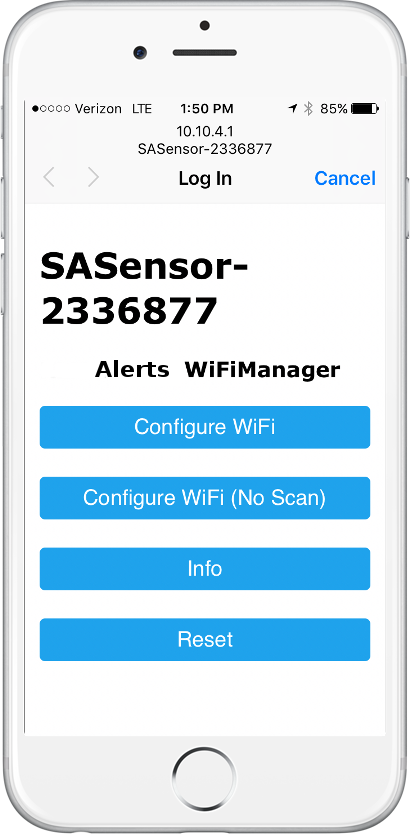
 Select SASensor-000000. Once connection is established, which may take 10-15 seconds, it will open a browser window with WiFi Manager. Please note, in case you do not see the WiFi Manager page, you may need to open a browser window and type in an address: 10.10.4.1. The window will look like this:
See Note 2 below if you are having problems with this step.
-
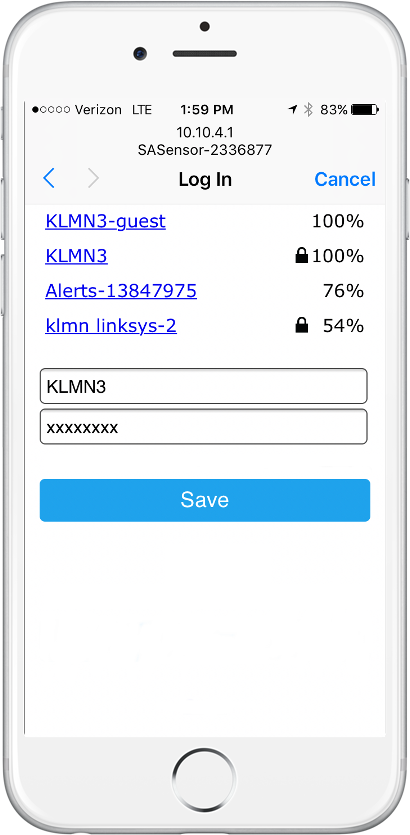
 When you select Configure WiFI, you should see the configuration window:
 -
Select your WiFi router and enter its password. Please note that some phones will CAPITALIZE the first letter. Make sure your password is entered correctly!
-
Press Save, and return the phone to its old WiFI network. Make sure that you see "Credentials Saved" on your phone. Otherwise you may need to perform this configuration process again.
To test your device separate the door sensor parts for 2 seconds. Once you have registered your MAILBOX Alert, you should get an email and a text message. Please remember that the portal limits the number of text messages sent to one every 5 minutes. So you may need to wait for 5 minutes to get a second text message. Your mail messages have no such restrictions.
Note 1: when a MAILBOX Alert is configured with a new phone number, the first alert is used for validation. Send another alert after 5 minutes to receive your first text message as a test.
Note 2: if you can connect to the SAS network but do not see the WiFi Manager configuration menu, you may need to open a web page at 10.10.4.1. If that page does not open, disconnect from SAS network by going back to Settings and selecting your Home WiFi network. Wait for 5 seconds and re-connect to SAS network. Sometimes it helps to go back to Settings, then click on WiFi again to re-connect.
You may also need to go back to Settings, and connect to your Home WiFi in case you are unable to establish connection with SAS network. This will force your phone to drop the connection and establish a new one. Then connect to SAS network and proceed with WiFi configuration.
