
You are here
Frequently Asked Questions - CALLME Button
You are holding the CALLME Button in your hands. How do you configure it to use your WiFi router?
Your new CALLME button needs to connect to the internet to send its alerts. They will then be forwarded as emails and as text messages to your phone. In order to do that it needs to know which WiFi network to use for communications. In addition, your CALLME button must be configured with an email and phone number to send notifications.
Please note: we recommend that configuration steps are completed in this order. Note also that some pages on this site are only available to registered owners. For example, you cannot Configure your device as directed in Step 3 until you have created your MySpool account and logged in, as directed in Step 2.
1. Setup your CALLME button to use your WiFi. This procedure is described below.
2. Create your account. Be aware that your account is not created until you have received an email from us and confirmed it by clicking on the provided link.
3. Login and click Configure Device to enter email and phone number for notifications.
To begin configuring your button, you will need to know the WiFi network name and its password.
How to setup your CALLME button to use your WiFi
-
Press the CALLME button. You should see a faint blue light indicating it is ready to be setup.
-
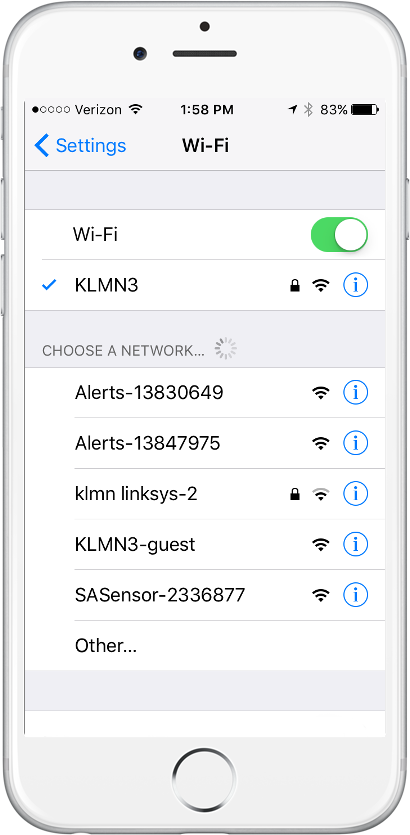 Open your phone, go to Settings, and choose Wi-Fi. Under the CHOOSE A NETWORK tab you will see available networks. One of them will be the CALLME button. It will look like SASensor-000000 where "000000" is the unique button ID. In the example below it is shown as SASensor-2336877
 -
 Select SASensor-233687. Once connection is established, which may take 10-15 seconds, it will open a browser window with configuration settings. Please note, in case you do not see the configuration page, you may need to open a browser window and type in an address: 10.10.4.1 . The window will look like this:
 -
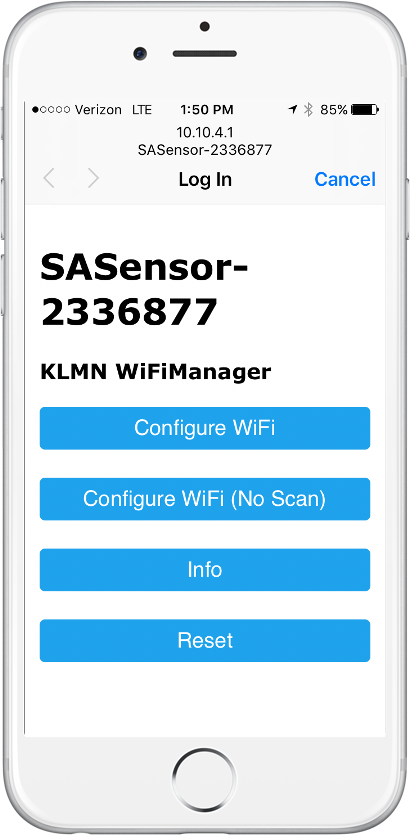
 When you select Configure WiFI, you should see the configuration window:
 -
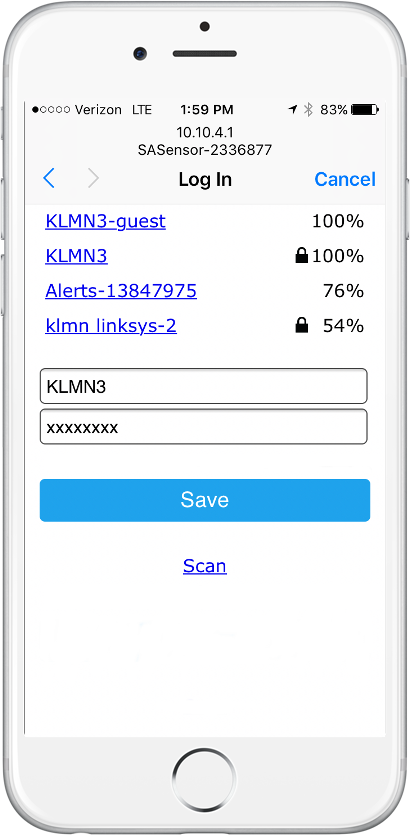
Select the WiFi router and enter it’s password. Make sure no trailing spaces are added.
-
Select Save, and return the phone to it’s old WiFI network, we are done with CALLME Button configuration!
-
Test your device: press the CALLME button. You should see 3 blinks when your signla has been sent. Please remember that the portal limits the number of text messages sent to one every 5 minutes. So you may need to wait for 5 minutes to get a second text message. Your mail messages have no such restrictions.
Note 1: when your CALLME button is being configured, i.e. it is waiting for you to enter WiFi credentials, a steady blue light can be seen. Once configuration has been completed and your CALLME button is unable to validate it's registration, a blinking blue light is seen for 10 seconds. In this case please create your account and configure your device.
Note 2: Please follow these directions to add a phone number to your CALLME button for text message notifications.
You are holding the Alert Button in your hands. How do you configure it to use your WiFi router?
Your new Alert button needs to connect to the internet to send its alerts. They will then be forwarded as emails and as text messages to your phone. In order to do that it needs to know which WiFi network to use for communications. In addition, your Alert button must be configured with an email and phone number to send notifications.
Please note: we recommend that configuration steps are completed in this order. Note also that some pages on this site are only available to registered owners. For example, you cannot Configure your device as directed in Step 3 until you have created your MySpool account and logged in, as directed in Step 2.
1. Setup your Alert button to use your WiFi. This procedure is described below.
2. Create your account. Be aware that your account is not created until you have received an email from us and confirmed it by clicking on the provided link.
3. Login and click Configure Device to enter email and phone number for notifications.
To begin configuring your button, you will need to know the WiFi network name and its password.
How to setup your Alert button to use your WiFi
-
Twist the red knob clockwise a quarter of a turn in the direction indicated by arrows. This will ensure that it is not activated. Activate it by pressing it down. An LED will indicate that your device is ready to be programmed with your WiFi. Important! Release the knob to ensure that it is ready to be activated by twisting it clockwise a quarter of a turn again.
-
Open your phone, go to Settings, and choose Wi-Fi. Under the CHOOSE A NETWORK tab you will see available networks. One of them will be the Alert button. It will look like SASensor-000000 where "000000" is the unique button ID. In the example below it is shown as SASensor-2336877. Write down this number and provide it when requesting help from myspool support.
-
Select SASensor-233687. Once connection is established, which may take 10-15 seconds, it will open a browser window with configuration settings. Please note, in case you do not see the configuration page, you may need to open a browser window and type in an address: 10.10.4.1 . The window will look like this:
-
When you select Configure WiFI, you should see the configuration window:
-
Select the WiFi router and enter it’s password. Make sure no trailing spaces are added.
-
Select Save, and return the phone to it’s old WiFI network, we are done with Alert Button configuration!
-
Test your device: press the Alert button. You should see 3 blinks when your signal has been sent. Do not forget to release the knob to ensure that it is ready to be used again by twisting it clockwise a quarter of a turn. Please keep in mind that myspool limits emails sent by this device to once per minute.
Note 1: when your Alert button is being configured, i.e. it is waiting for you to enter WiFi credentials, a steady blue light can be seen. Once configuration has been completed and your Alert button is unable to validate it's registration, a blinking blue light is seen for 10 seconds. In this case please create your account and configure your device.
Note 2: Please follow these directions to add a phone number to your Alert button for text message notifications.
If you need to reset your Alert Button to the factory settings or simply need to re-configure it to use another WiFi router, you need to erase old WiFi information first. How is it done?
If you need to move the Alert Button to another location or re-configure it to use another WiFi network, you need to clear it of old WiFi information first. How is it done?

Use a phillips screwdriver and remove 4 screws from the top of the yellow cover. You will see a battery holder on one side of the push switch and a green circuit board on the other. The circuit board has two small push switches as shown here:
Press and hold the CLEAR button. Then, while keeping the CLEAR button depressed, press the TEST button. After a few seconds, you will see a steady blue light at the bottom of the Alert Button. It indicates that your device has been cleared of WiFi information. Let go of both buttons. Your Alert Button is ready to be configured with a new WiFi network.
If you need to reset your CALLME Button to the factory settings or simply need to re-configure it to use another WiFi router, you need to erase old WiFi information first. How is it done?
If you need to move the CALLME button to another location or simply need to re-configure it to use another WiFi router, there are two approaches. The simplest one is if you have an already configured and connected CALLME button. In this case, you can prepare it for the move on the "Configure Device" page: click on the Move Device checkbox which will instruct the button to clear its WiFi configuration the next time it is pressed. After pressing it, verify that the configuration has been cleared: when the configuration is cleared, a small blue led inside the button will light up. It indicates that the CALLME button is now ready to be configured, just like it was when you first received it.
If your button is not connected or is misconfigured, you will need to remove the battery cover first. When it has been removed, you will see the reset hole - marked with the red arrow in the image below.
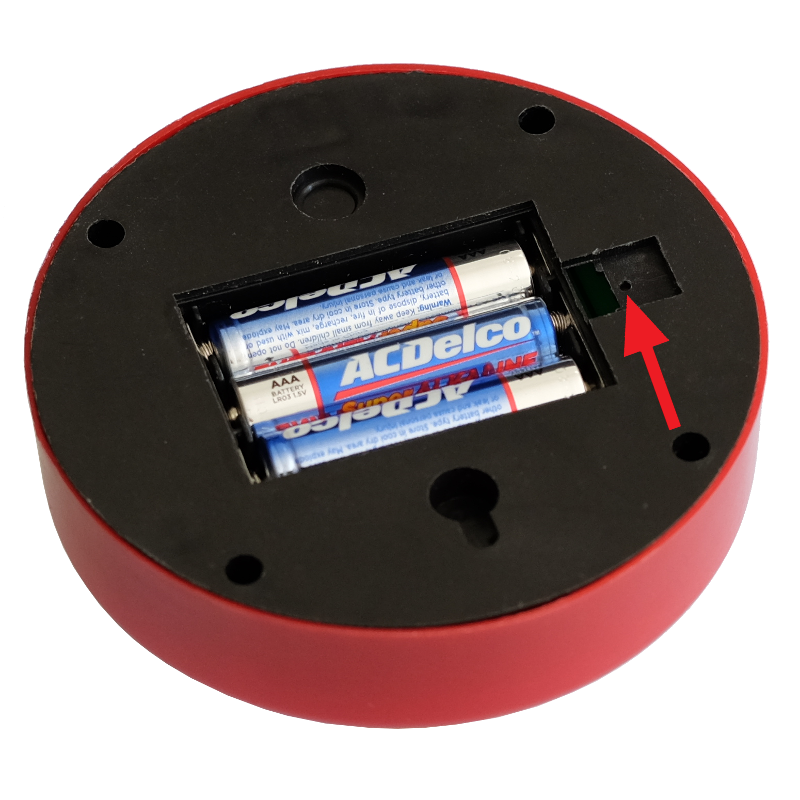
Insert a paper clip in the reset hole and press it gently until you feel a click.
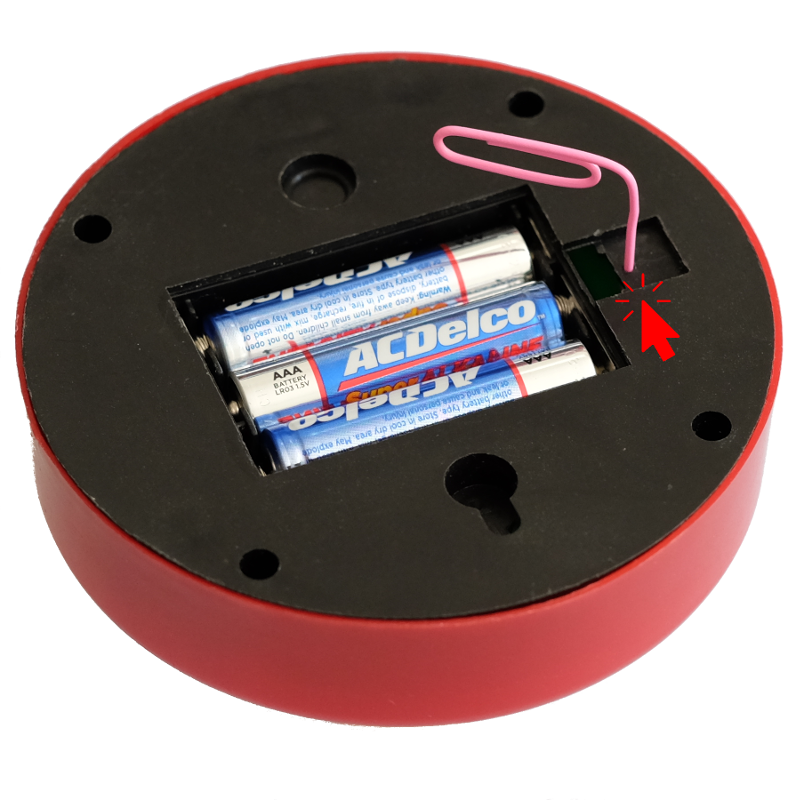
While holding the paper clip in the depressed position, push the top of the CALLME button and hold it for a few seconds. When the configuration is cleared, a small blue led inside the button will light up. It indicates that the CALLME button is now ready to be configured, just like it was when you first received it. Please follow the configuration steps to specify its new WiFi as you have done before. As a reminder, the procedure is described here.
The CALLME button uses proprietory circuitry to miminize battery use. It only uses it's batteries when communicating with the cloud server and confirming that the alert had been sent. The three quick blinks of the LED are that confirmation. Based on our calculations, using the button a few times a day will not require new batteries for well over a year.